Nex - Angel of Death (AoD) Info & Guide
So, our story begins... We will be testing the waters with hosting a Nex - Angel of Death mass (alongside potential 7-man teams with experience in the future). The active team signup sheets will be on our discord server under the PVM Hosting text tab -
https://discord.gg/8B5nhYU.
Please let us know be it on discord or a response to this post if you want to LEARN this boss and if it’s something you are interested in and whether or not there is a particular role you would like to give a go/learn.
We will be needing to see some experienced players involved due to the intensity and mechanics of the fight, however, will not be specifically needed in the circumstance of massing if we have enough players The guide below will be put as simple as possible so that those that have zero understanding can understand and follow along. This boss is intense and can be considered heavy in terms of mechanics, all will be explained.
Please be wary that this is amongst one of the endgame bosses, thus proving some difficulty and you may find that a kill may take more than one attempt in order to gain a successful kill.
I ask that you please, please, please be patient with not only the host but also with all teammates inside or outside of the clan.
GENERAL INFORMATION
LP: 3,000,000 (split-up between phases)
Attack Styles: Magic, Melee
Max hit: 5000+
Weakness: None, susceptible to Inquisitor's staff. Immune to poison.
AoD will dominantly use a magic based attack to everyone within range so it is always important to be using deflect/protect from magic during the fight.
Spawn & Positioning (Pillars/Minion Rotation): -As shown in the picture below is the general layout of AoD’s arena with the compass facing North. (Grey circled areas are where the Minion Tanks can utilise the flanking perk on the almagamation crystals for extra dps and is the optimal positioning for the mid lure)
Power from Elements/Blood Reavers (Phases 1 & 2): -Nex will shout “Elements they call to me.” she will then jump in the air (slamming down in the centre of the arena causing moderate typeless damage if you are within close range to the centre). Ice walls will spawn dividing the arena into quadrants, spawning blood reavers into each quadrant that Nex is NOT facing. The reavers will not be aggressive but instead will move towards Nex and will heal her for half of their remaining life points should they reach her. Players will want to stun and kill the reavers as fast as possible to prevent any type of healing to Nex. In the quadrant that Nex does face she will call out “Witness their raw power” and all players within the quadrant will be hit for 3.5k damage 3 times for a total of 10.5k, this can be negated with the likes of Resonance/Reflect/Debilitate.
Should a reaver reach Nex it will reset all players defensive abilities as well as healing Nex and dealing damage equal to the heal split amongst the team. As an example, a reaver at full hp (50k lp) will heal Nex for 25k and deal 25k damage to the team (3751 damage to each individual player assuming there is a minimum of 7 people)
Shadow Orb Spec (Phases 1 & 2): - Nex will shout “Let the shadow engulf you. Give into it.” spawning 3 individual shadow balls per player placing them where you are stood dealing 300 typeless damage per tick you are stood on them. Simply walking one step away is enough to avoid all damage but you will need to repeat this 3 times for each shadow. It is important to keep these away from other players (particularly the base tank) as they can in fact deal damage to others as well as yourself.
Minions (Umbra/Glacies/Cruor/Fumus) (Phases 2 & 3): - At 2,100,000 LP Nex will callout “you’ve done well this far but It ends here” and she will begin summoning her 4 followers in the form of Ancient Magiks; Umbra (Shadow), Glacies (Ice), Cruor (Blood), Fumus (Smoke) by spawning 4 Amalgamation crystals (40k LP) in their respective corners and will have a progress bar above them. The team will want to destroy these crystals to debuff the minions reducing them to combat 750 with 150,000 LP and a lowered defensive affinity. If any of the crystals are not destroyed, the respective minion will spawn with a combat level of 1,000 with 300,000 LP. Minions have use of the adrenaline system and will make use of deep impact & asphyxiate so be sure to rotate between freedom and anticipate preventing yourself from being stunned. PLEASE NOTE the order of the minions being killed needs to be Umbra, Glacies, Cruor and then lastly Fumus. This is key for the later phases particularly bomb placements and the cycle of crystals in the final phase.
Smoke Walls (Phase 3): - Nex will callout “Feel the smoke around you, let it consume you” and will target 2 players at random. One player will have the smoke line spawning from the North and the other player being targeted from the East. After a few seconds from the callout a line of smoke will spawn on the player where they are stood and will deal rapid 2000 magic damage to any player stood within but can be mitigated with the use of devotion, however it will remain spawned for some time thus is inadvisable to stay stood within the smoke. It is imperative that the players targeted take a note of the direction they are being targeted from and move to an opposing direction. As an example, if being targeted from the north the player should stand beside the east or west walls so that the smoke line will be along the edge of the arena and out of the way from the rest of the team. If targeted from the east, you should position yourself on the North/South wall for the same reason.
Smoke Pool: - Nex will callout “even I cannot control the element of smoke” at which point a game chat message of “Nex casts a thick black smoke towards the centre of the arena”. Nex will send a small cloud in a random direction which upon landing will spawn a smoke ring. When someone stands in the ring a unstable crystal will spawn which can be clicked on to activate. If no one activates the crystal the team will take 37,5000 damage evenly split between the team (5358 if in a 7 man). If someone clicks to activate the crystal all players stood in the ring will take 14,000 damage evenly split between them (4333 damage if 3 people stand in the ring). All players damaged by the ring will have their defensive abilities reset.
Ice Prison: - Chosen at random one or two players (depending on how many players are in the arena) will be stunned and will collapse an icicle on them trapping them in a “prison”. The targeted players will have their defensive abilities reset and put onto cooldown for 20 seconds, except for anticipate and preparation. They will briefly be immune to all damage however will spawn stalagmites in a 5x5 radius underneath them and any player within the radius will also take damage (5k if underneath, 2,500 if 2 steps away and 1,666 if caught on the edge) and be briefly stunned. The icicle has 20,000 LP and will need to be cleared by the team as soon as the targeted player is trapped.
Elements Instakill & Bomb: - Nex will target a player at random and callout “Nex has marked you to take the full force for elements”. A blue progress bar will appear above the targeted player and you will need to stand in the blue dome area in the middle of the arena. If the bar fills and you are not stood within the dome you will be instantly killed and cannot be mitigated even with the likes of immortality/barricade. If you sign of life or ultimately die you will not have to deal with the follow up mechanic. Should the player reach the dome in time a follow up message will be called “the shield dome blocks most of the damage, but you still feel the power inside”. Similarly, a second blue progress bar will appear and once it has been filled it will disappear but spawn a large elemental bomb where the player is stood dealing 3,000 damage every 2 game ticks. The bombs are spawned permanently until Nex is defeated so it is imperative that they are placed strategically and are away from the centre of the arena. Typically, teams will place them along the edges of the arena but always behind the dps pile as they move forwards in destroying the crystals. As an example, if the team is still at the Umbra crystal you will place the first bomb between the dps pile and the Fumus crystal (as this is away from the team and won’t be in the direction they need to head in order to progress) and the subsequent bombs are then placed next to each other, repeated around the arena.
Crystal Cycle: - The order that the crystals needs to be destroyed is heavily dependant on the order the minions are killed in, typically teams aim to go in a counter-clockwise direction starting in the south-east with Umbra, north-east with Glacies, north-west with Cruor and lastly south-west with Fumus. Each crystal grants Nex an extra ability as explained below however if the minions are killed in the suggested order there should be a minimal risk.
Shadow Traps: Shadow Crystal (Umbra) – Nex will gain the ability to spawn shadows underneath players causing 4800 typeless damage to be dealt if stood in (like the regular Nex encounter during shadow phase). It is key to keep moving around to ensure that you keep moving around and checking you are not stood in any of the shadows as you can stand in other players shadows and be dealt the damage.
Freeze: Ice Crystal (Glacies) – Nex will gain the ability to prison you similar to the previous phase however you will get an opaque overlay on your screen that gradually increases to the point where you will suffer from a 2000 melee bleed but it can simply be avoided with the use of freedom.
Blood Siphon: Blood Crystal (Cruor) – Simply put Nex will heal off the damage she is dealing until the crystal is destroyed.
Virus: Smoke Crystal (Fumus) – Nex gains the ability to infect players with a “virus” which will drain your stats and reduce your overload timers. The virus has 3 stages low, medium and high, once it has reached its final stage the player will be drained a percentage of their prayer points based of their current points level (the less prayer you points you have the less you will lose). Nex also gains the ability to poison players with her magic attacks that can deal 1600 damage per poison damage but can be combated with the use of venomblood perks and antipoison++ potions.
RECOMMENDED GEAR & SETUPS
It is highly recommended that you bring either a Ranged or Magic setup as show below, however if you were to bring a melee setup please be aware it is only advisable for the experienced due to the extensive mechanics of the fight.
(If you are unable to read the images, right click them and choose to open in a new tab/window)
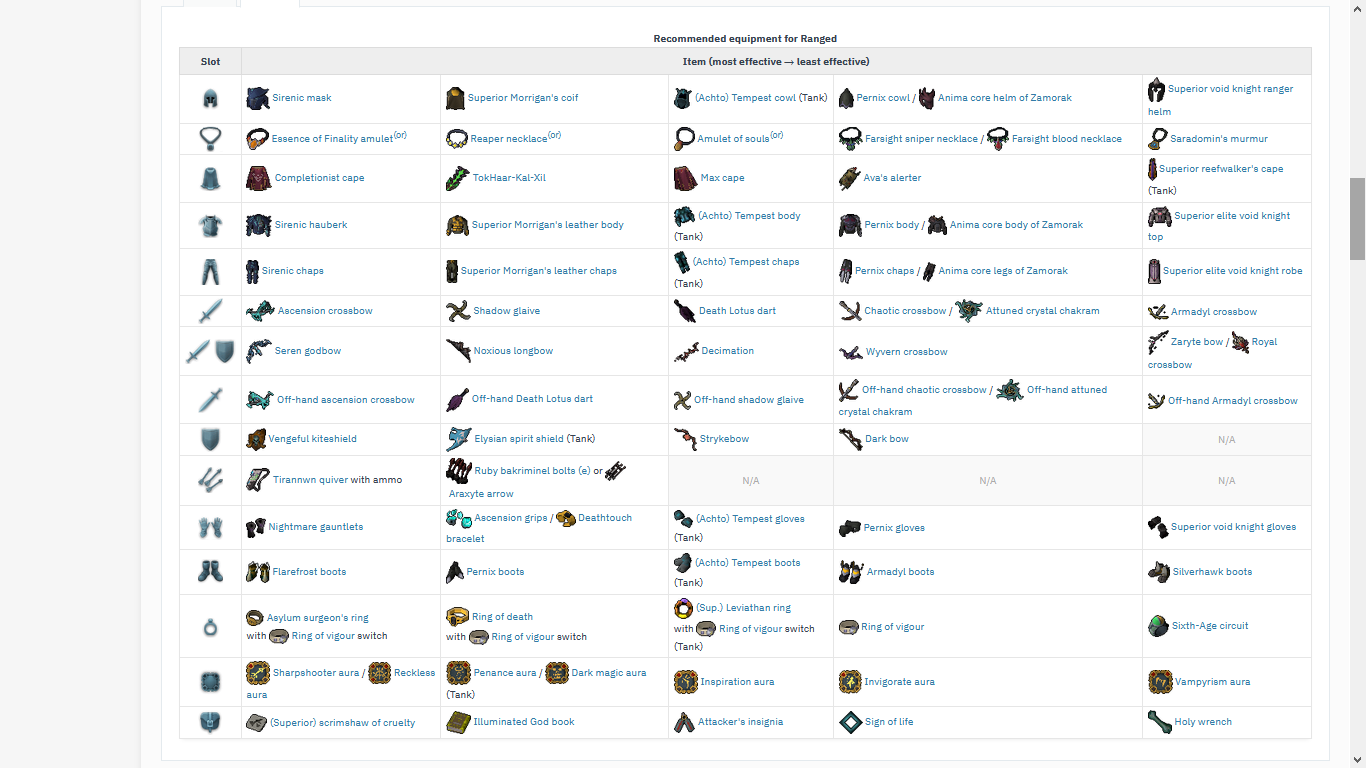
RANGED: -
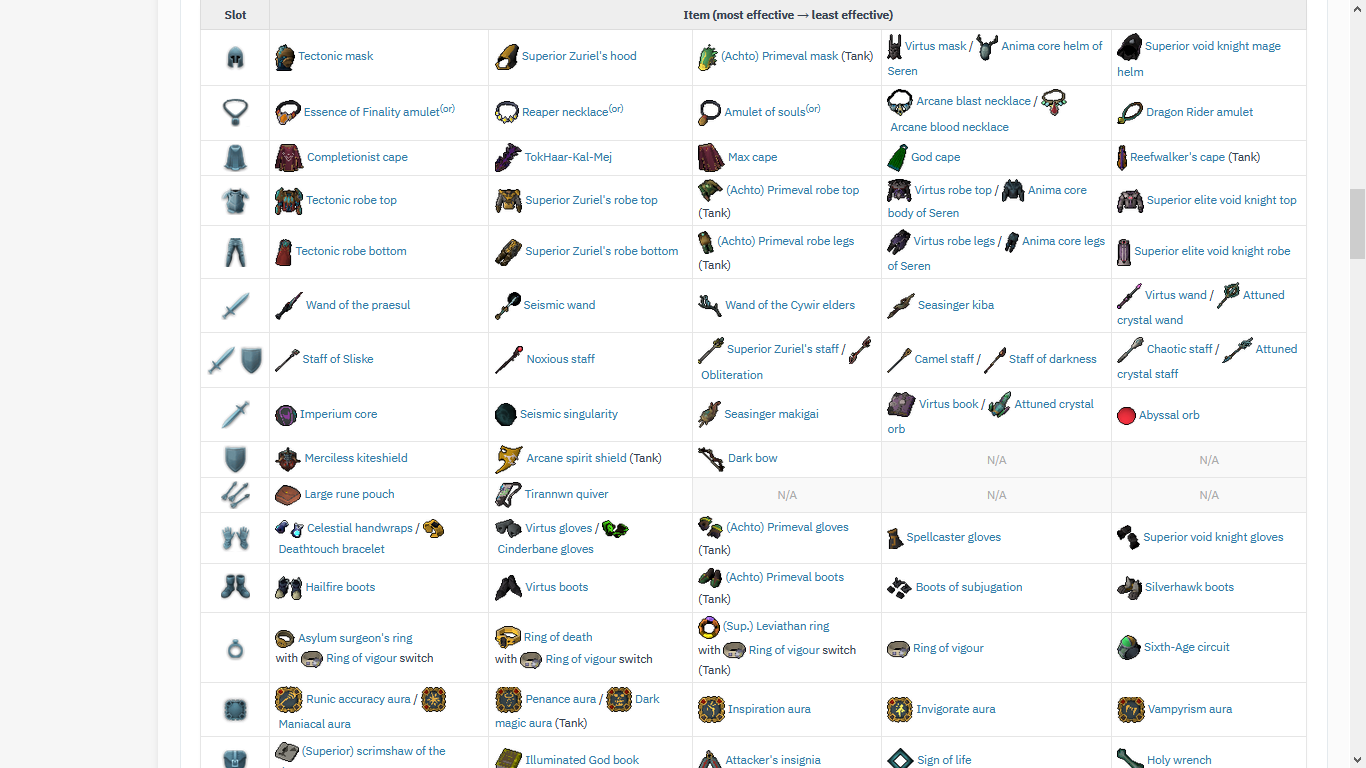
MAGIC: -
ROLES & RESPONSIBILITIES
See below the following roles with their respective responsibilities as well as a short-written guide on how to complete them.
SHOULD ANY ROLE DIE IT IS IMPERATIVE TO IMMEDIATELY NOTIFY THE TEAM SO THAT THEY CAN ASSIGN IMMEDIATE COVER.Base Tank: -Responsible for maintaining the aggression of Nex throughout the duration of the fight and making sure that she is positioned correctly i.e. centred for phases and the dragging away for the final phase. Base tanks can utilise pack mammoths and their scroll special attacks allowing them to eat from the familiar’s inventory to prevent adrenaline loss.
Chinner: -Responsible for clearing the minions with the use of mechanised chinchompas (after the MT have lured and stacked them in the centre) and calling out the order they are killed in, strategically Umbra, Glacies, Cruor and Fumus. It is also expected for the chinner to be ready to voke Nex in the event the base tank either needs support or dies.
Hammer: -Responsible for maintaining the Statius Warhammer debuff special is applied throughout the fight optimally at the start of phase 1, 3 and 4 (after the pillars have been destroyed).
Minion Tank (MT): -Responsible for binding/entangle/ice barraging Blood reavers on phase 1 in order to stun lock and prevent them from potentially healing Nex. Also responsible for killing the amalgamation crystal spawns on phase 2 alongside luring the minions and stacking them in the centre so that the chinner can provide additional support in clearing them quickly.
DPS: -Is responsible for simply outputting the maximum amount of damage to AoD/Blood Reavers/Minions and running support for the mechanics that are randomised, Smoke walls, Ice prison and Bombs.
BREAKDOWN OF THE FIGHT
Phase 1: -Attack cycle: 5 auto attacks, Power from Elements, 4-14 auto attacks (random), shadow orbs, 4-14 auto attacks, repeat from Elements. This is the beginning of the fight and should only be initiated by the assigned base tank. Nex will always use 5 auto attacks at the start before using Power from the elements special which is then alternated with shadow orbs special at 4-14 auto attacks at random. These specials are repeated until Nex reaches 1,800,000 life points and are used in phase 2.
Phase 2 (Initiated at 2,100,000 LP): -Attack cycle: Minions spawn (Umbra/Glacies/Cruor/Fumus), 4-14 auto attacks, Elements/Shadow spec continued from phase 1, 4-14 auto attacks, repeat from Elements/Orbs until 1,800,000 LP. At 2,100,000 Nex will spawn the 4 amalgamation crystals and will begin the process of summoning her 4 followers. The minion tanks will take charge of destroying each crystal (with the support of Dps) and retain the aggression of their respective follower and will lure the minions via Surge. Nex will continue to use the same special attack cycle from phase 1 so you will need to watch out for the Elements and Shadow orb attacks up until 1,800,000 where she will begin a new cycle of attacks and begin phase 3. The Dps should concentrate and focus on Nex so that damage to is maximised whilst the MT and Chinner are able to fulfil their respective roles. PLEASE NOTE the order of the minions being killed needs to Umbra, Glacies, Cruor and then lastly Fumus. This is key for the later phases particularly bomb placements and the cycle of crystals in the final phase.
Phase 3 (Initiated at 1,800,000 LP): -Attack cycle: 4-9 auto attacks, Smoke wall/Smoke Pool/Icicle (random), Smoke wall/Smoke Pool/Icicle (random but a different special than the previous), 4-9 auto attacks, repeat until 600,000 LP and all Minions have been killed. After reaching 1,800,000 LP Nex will begin a new cycle of special attacks in the form of Smoke walls, Smoke pool and Ice prisons. These special attacks are chosen at random between 4-9 auto attacks and are never the same special back to back. This cycle will repeat up until 600,000 LP have been reached and Nex’s 4 summoned followers have been killed. After each minion has been killed there will be a coloured text message to verify the order the minions have been killed in as this is very key to the final phase. PLEASE NOTE the order of the minions being killed needs to be Umbra, Glacies, Cruor and then lastly Fumus, this is to make the final phase as simple as possible and removes the most danger. The order the minions are killed will match the order you destroy the crystals in the final phase.
Phase 4 (Initiated at 600,00 LP): -Attack cycle: Elements insta-kill, magic auto attacks, repeat until all crystals have been destroyed and Nex is has been killed. Once Nex reaches 600,000 LP she will become completely invulnerable to all attacks harnessing a power from the surrounding 4 crystals. Nex will no longer use melee attacks and will remain using a magic attack for the remainder of the fight. The team will proceed to attack and destroy the crystals (in the same order the minions were killed, again ideally Umbra, Glacies, Cruor, Fumus) whilst dealing with the randomised Elements insta-kill mechanic. Nex will stall at the beginning of each Elements insta kill spec and can be utilised to soul split for a quick heal. Once all 4 crystals have been destroyed Nex can once more be attacked, however bomb runs will remain until she is defeated. Once she has been killed, drops will spawn in the centre of the arena (should you be both lucky and good enough to get one) as well as a teleport shard to leave the arena, which you can also check/loot for the 2 lorebooks associated with AoD (should anyone want them).
Congratulations on defeating Nex the Angel of Death!!!
TIPS
■ The biggest tip of all is be sure to check out Video guides to gain some form of an idea to the mechanics and familiar ise yourself with how the boss works.
■ Joining the ongoing call during the kill will be incredibly helpful whether you are a beginner/learner or a experienced/veteran.
■ Bringing a sign of life/portent of death as well as a ring of death is highly recommended.
■ As always doing your own research with looking into guides and videos can be extremely helpful.
VIDEO GUIDES & EXTRA LINKS