Yakamaru Info & Guide
So, we begin… In the upcoming weeks we will be trying and attempting to host a full Raid including Yakamaru. The active team signup sheet will be on our discord server under the PVM Hosting text tab -
https://discord.gg/8B5nhYU.
Please let us know be it on discord or a response to this post if you want to LEARN this raid and if it’s something you are interested in and whether or not there is a particular role you would like to give a go/learn.
We will be needing to see some experienced players involved due to the intensity and mechanics of the fight!!The guide below will be put as simple as possible so that those that have zero understanding can understand and follow along. This boss is immensely intense and is very heavy in terms of mechanics, all will be explained.
Please be wary that this is amongst one of the toughest and strongest bosses in the game and will more than likely be with teams with players learning the mechanics and how the boss works alongside of potentially taking several attempts in order to gain a successful kill.
I ask that you please, please, please be patient with not only the host of the raid but also with all teammates inside or outside of the clan.
GENERAL INFORMATION
LP: 5,600,000+ (split-up between pools/phases)
Attack Styles: Ranged, Magic
Max hit: Variable (3,000 base damage)
Weakness: None
Yakamaru will dominantly use a ranged attack within a 20x20 radius so it is always important to be using deflect/protect from ranged during the fight. IF you go within 2 squares of a pool you will be hit with Magic style attacks instead.
The general premise is to attack Yaka in his centre pool and deplete his health down (200k at a time) forcing him to phase into a different pool. You will then deplete his health down to empty and he will phase back to the centre pool where you can once again bring his health down permanently by 200k. This process is repeated until he phases for a final time into what is called his “Mirage” phase where the team is required to combat all the phases at once with a massively reduced LP (150k per pool). Each pool and Mirage phase will be fully explained further into the guide below due to each pool having their own mechanics and requirements within the team.
Spawn & Positioning: -As shown in the picture below is the general layout of Yakamaru’s arena with the compass facing North. The area marked with a red cross is the ideal location for the dps pile to be positioned with the base tank on the opposite side of any of the pools, it is advised that the dps are to stick together as a pack at all times unless a role is fulfilling their duty.
Jellyfish: - Throughout the fight Yaka will spawn several Jellyfish similar from those found in the Puzzle. When Jellies spawn up to 5 geysers will also spawn with them (dark spots on the ground) that will shoot up and deal magic damage if you are stood on them. You can make the use of the resonance ability to gain a free heal from these attacks otherwise simply avoid standing on them. For every geyser that is “tanked” the corresponding Jelly will take 10k damage, so it is advisable to resonance the hit if possible.
It is important to prioritise the Regular Jellyfish (50k LP) spawns as these possess the most danger and can hit rapid 2.5k melee hits, however due to them being Melee based a simple stun or bind can halt them in their tracks and negate damage. The durable jellyfish can heal the other spawns as well as Yakamaru so it is key to target these as a second priority.
DO NOT attack the reflecting jellyfish as it is invulnerable to all damage and is killed by killing all the other jellies.
It is also important that during each phase of the centre pool that 4 Jellies will spawn to assist Yakamaru, it is key to make sure that these are also killed and cleared particularly for when Yaka phases onto the Sand Pool as players will be completely vulnerable and susceptible to damage from both Yaka and the Jellies should you find yourself Sanded (see sand phase for more detail on this effect).
Waterman effect: -Yakamaru will periodically choose a random non-target player to become an entity of water (similarly to the animation of metamorphosis ability if using water spells) that will hit for 1500, then 2500, then 3500, then 4500. To negate/prevent the damage you will need to be standing next to a player that has not already been under the effect in order to pass the ability on (this is why standing close together is helpful). It is generally advised to stay above 5k LP in case you are unable to pass the effect on.
Poisoning Yakamaru: -When Yakamaru reaches 100k LP for any of the special pools (tendrils, shark, sand, and stun) he will spit out a poison ball that is marked with a green cross on the ground to indicate the position that the poison tank needs to be in order to tank the poison. It is advised for all players other than the base tank to stop attacking Yaka to allow time for the poison tank to get into position and apply the effect to themselves then get into position in order to pass the effect onto Yaka (explained below in more detail for both the centre/poison pool info and the Posion tank role).
IF the poison is not passed onto Yaka you will have to repeat the same pool again as he will phase back to the centre pool and then back to the previous pool, this is why it is important to stop attacking Yaka so that the poison is not skipped.
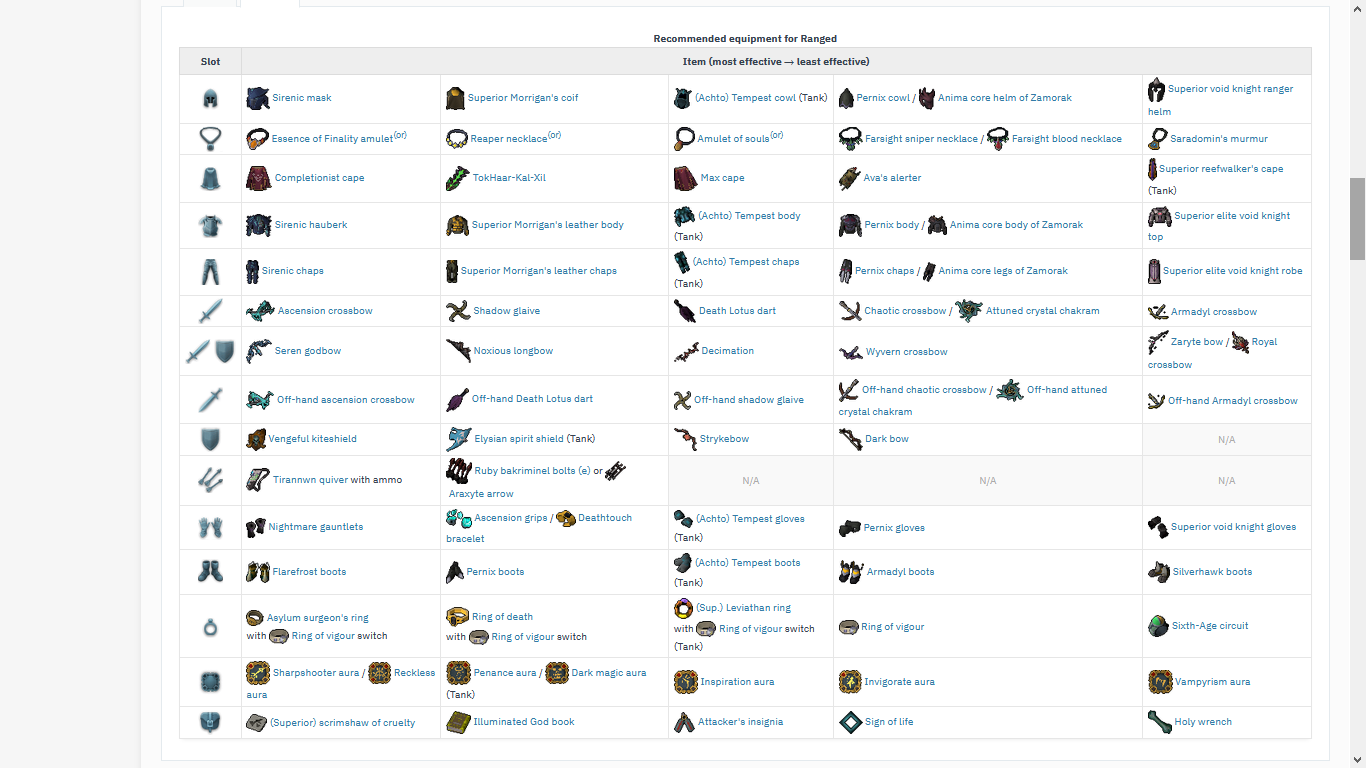
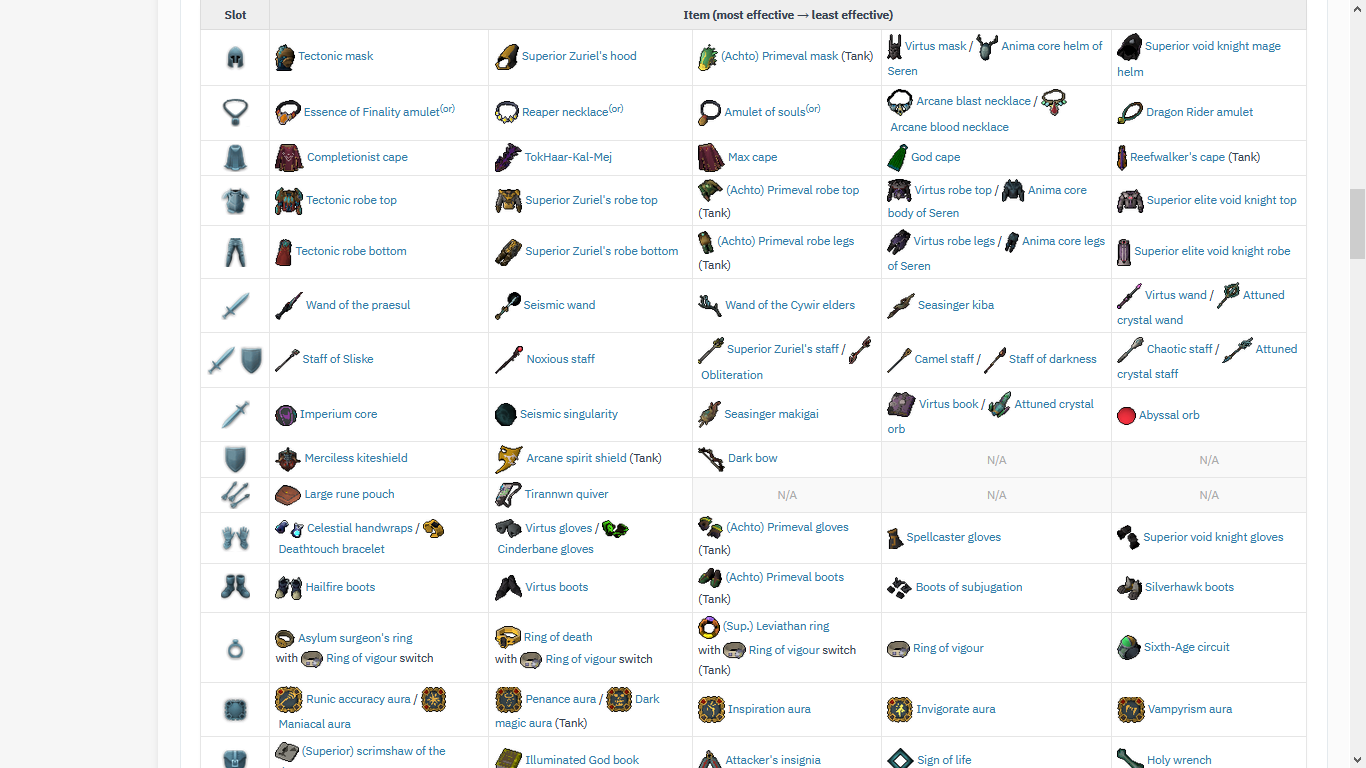
RECOMMENDED GEAR & SETUPS
It is highly recommended that you bring either a Ranged or Magic setup as show below, however if you were to bring a melee setup please be aware it is only advisable for the experienced due to the extensive mechanics of the fight.
RANGED: -
MAGIC: -
ROLES & RESPONSIBILITIES
See below the following roles with their respective responsibilities as well as a short guide on how to complete them. They will also be noted in brackets during which phases they are required.
All roles (with the exclusion of the base tank) will share the responsibility of ensuring that all Jellies are killed and taken care of during the entirety of the kill and during each phase spawn up until the Mirage Phase where the responsibility will fall to the Jelly Wrangler (see below).
SHOULD ANY ROLE DIE IT IS IMPERATIVE TO IMMEDIATELY NOTIFY THE TEAM SO THAT THEY CAN ASSIGN IMMEDIATE COVER.Base Tank (all phases & Tendril Pool tank during Mirage Phase): -Has the responsibility of keeping the main aggression of Yakamaru aimed towards them and keeping the enrage stacks away from the dps pile. This role can tank Yaka whichever way is preferred be it in melee distance using prot mage or at range using prot range. Use of freedom is to be used as often as possible to bring the enrage stacks as low as possible as well as cycling through resonance, reflect, debilitate, devotion, barricade, immortality. Having a minimum of 3 pieces of Ahcto equipped is highly recommended due to the passive ability of resetting the cooldowns of all defensive abilities can be incredibly helpful alongside the use of a spirit shield with the penance aura to reduce the damage taken. Also responsible for tanking the Tendril Pool during the mirage Phase ideally positioned on the east side of the pool.
North Tank (Mirage Phase): -North tank is usually considered to be the backup tank in case the Base tank dies. They are also required to tank both the sand and stun pools on the mirage phase. It is recommended for them to tag sand and then provoke the stun pool with the use of devotion. Similarly, to the base tank it is highly advisable for them to be using the 3-piece Ahcto & spirit shield with penance tanking methods. The North tank should be also provoking and stunning any Jellies that spawn near the stun pool to prevent them from breaking the Stun DPS out of their onslaught early. Once the stun pool is closed you’ll solely tank the sand pool and deal with any Jellies by running round the pool or making use of barrage/stun abilities.
Main Stun (Stun Pool): -Is responsible for stunning Yakamaru during the stun pool phase to reduce the defence affinities of Yaka to allow for maximum dps. When Yaka is stunned a message is broadcast to the entire team notifying them of the stun and who effectively caused it. The team will be damage for 1000 Damage when this happens, it is key that this is done periodically because if the stun is applied too quickly the damage to the team will be 5000 and can wipe people out relatively quickly.
DO NOT UNDER ANY CIRCUMSTANCES STUN YAKA DURING THE STUN POOL UNLESS YOU ARE INSTRUCTED TO.Backup Stun (Stun Pool): -Is responsible for stunning Yakamaru should the main stun splash all their stuns.
Shark 10 (Mirage Phase): -Is responsible for maintaining the aggression of the Shark Pool during the mirage phase ideally position to the south or west of the pool away from the dps pile. They are also required to collect 10 planks from the beach (where the poison tank washes ashore and the cpr revives them) to cover the pool once the health of the pool is depleted. Should the tank find themselves needing to tank the sharknado special attack it is recommended to use the barricade ability.
Stun 0 (Mirage Phase): -Is responsible for closing the stun pool immediately at the beginning of the mirage phase. It is recommended that during the final centre pool before mirage that you do not use an adrenaline boosting pot and to save it for when the stun mirage is spawned. It is highly recommended to do the following: position between the centre pool and the stun pool. Build adrenaline to 100% before the mirage phase begins. When the stun mirage appears, immediately use devotion, drink an adrenaline potion, and immediately release onslaught. The waterman effect during this phase hits a 2000 as a one-off damage and is not worth breaking the onslaught for passing the effect on. Once this pool is closed, they will they run along the east side of the beach (to avoid sand pool) and support the Shark and Tendril pools.
Stun 5 (Mirage Phase): -Is responsible alongside the Stun 0 for closing the Stun Pool (see above Stun0 Role) with the exception of requiring the 5 planks each from the beach (where the poison tank washes ashore and the cpr revives them) in order to fully close the pool once the health has been depleted of the mirage.
Poison Tank (Every pool excluding Stun/Mirage): -Are responsible for tanking the poison ball that Yakamaru spits out at 100k LP marked with a green cross on the ground to indicate the position you will need to stand in. Once you have tanked the poison and it has been applied to yourself you will then go within melee distance of Yaka (a minimum of 2 tiles away) and use the protect magic prayer. Once Yaka’s health has been depleted you will be eaten and will be spat back out on the east beach once Yaka has phased back to the centre pool. You will then be revived by the cpr and will return to the dps pile.
THIS IS NOT REQUIRED ON THE STUN POOL UNLESS THE ROTATION OF YAKA BEGINS ON STUN POOL.Double Poison (Sand Pool): -Is responsible for tanking the poison alongside the Poison tank during the Sand Pool (see above Poison Tank role). You will be expected to hold the poison until the next phase (Stun Pool) where you will then go melee distance in place of the Poison Tank and use prot magic and get eaten as they would’ve. The Poison effect can be troublesome in terms of taking damage and it is always advised to keep your health as high as possible under the effect of the poison.
THIS ROLE MAY BECOME OBSOLETE AND NOT REQUIRED IF THE STARTING ROTATION OF YAKA BEGINS ON STUN POOL.CPR (Every pool excluding Centre/Mirage): -Has the responsibility of reviving the Poison Tank (see above Poison Tank roles) once Yaka has successfully been phased back into the centre pool. You will simply run to the east side of the beach and eat to full hp and/or activate devotion and click ONCE to resuscitate the Poison Tank back to life. It is important that you either eat to full hp or use devotion as you will still receive damage from Yaka’s attacks and any animations (eating food, drinking a pot, activating an ability) will interrupt the reviving process you will have to start over and run the risk of killing the poison tank.
Jelly Wrangler: -Is responsible for provoking all Jellyfish that spawn during the mirage phase to allow all other roles to be uninterrupted. Use of incite and stuns will help massively but be wary of using stuns you will need to have them attack and hit you before stunning otherwise they can become aggressive to the dps/roles.
DPS: -Is responsible for simply outputting the maximum amount of damage to every pool as and when it is required. They are also responsible for supporting the other roles in terms of casting debuffs (vuln/swh spec which isn’t necessary/guthix staff spec/group veng etc) as well as helping to kill any Jellies that spawn. It is also advisable to use Ice Asylum should the team be struggling in terms of supplies in order to save food and prolong lives.
BREAKDOWN OF THE FIGHT
Centre Pool: -Attack cycle: 3 auto-attacks, jellyfish spawn, 3 auto-attacks, waterman, repeat.This is the beginning of the fight and should only be initiated by the assigned base tank. After 200k LP have been depleted Yaka will randomly phase to one of the other pools and will then phase clockwise through the pools with the following rotation: Tedrils, Shark, Sand and finally Stun. As an example, if he phases to Shark pool first the rotation becomes Shark -> Sand -> Stun -> Tendrils.
Should Yakamaru not have the poison effect he will still spawn here however you will have to repeat the same special pool he just phased from.
At all times the Dps pile will be on the west side of the pool dealing with the geyser spawns and Jellies with the base tank on the east.
Centre Pool (Poisoned): -Attack cycle: (resumed from the last centre pool) 3 auto-attacks, jellyfish spawn, 3 auto-attacks, waterman, repeat.Yaka will phase from this pool after 200k LP is lost in a clockwise rotation from his last pool. If unpoisoned he will spawn back to the same pool with an additional 50k LP. Whilst poisoned all players will deal double damage to the centre pool so it is important to DPS as hard as possible in order to phase relatively quickly.
4 Jellies will spawn from the pool Yaka recently phased and will begin to walk towards the centre pool, they are unaggressive until the poison effect has been applied to Yaka. The poison is only removed if; Yaka has received enough damage to phase, a jellyfish touches him or if a durable/reflecting jellyfish is killed.
Be sure to kill and clear any remaining Jellies before Yakamaru has phased to prevent any unecessary damages to the team during the next stage of dps.
During this phase 5 planks will spawn on the east beach so if you have a role requiring planks now is the time to get them.
Tendrils Pool: -As with every special pool at 100k LP to stop attacking Yaka to allow time for the poison tank to complete their role. At 50k LP the CPR should be preparing to surge/run towards the beach to revive the Poison tank. Once Yaka’s health has depleted he will return to the centre pool.
Attack cycle: 4 auto-attacks, jellyfish spawn, 4 auto-attacks, waterman, 4 auto-attacks, tendril special, repeat.During this phase there is 2 special attacks to watch out for and are used at the same time, the first one and is usually aimed at the base tank is a group of tentacles that will deal heavy damage rapidly (2000 damage per tick) which can easily kill player that you will simply need to run away from. The second is a choke mechanic that is targeted at the top 5 dps and you will take roughly 200 damage every game tick as well as having all your defensives put on cooldown. If affected by the choke you will be freed once the rest of the team has done enough damage to Yaka.
For the mirage phase it is recommend to let base tank to tag the tendril pool before attacking in case the Tendril spec is activated immediately and the 2000 per game tick damage is applied. This can easily catch people off guard so be sure to maintain high LP.
Shark Pool: -As with every pool at 100k LP to stop attacking Yaka to allow time for the poison tank to complete their role. At 50k LP the CPR should be preparing to surge/run towards the beach to revive the Poison tank. Once Yaka’s health has depleted he will return to the centre pool.
Attack cycle: 4 auto-attacks, jellyfish spawn, 4 auto-attacks, waterman, 4 auto-attacks, Sharknnado special, repeat.During this phase Yaka will have the ability to spawn a sharknado (easily visible by the tornado animation that builds over time on the pool) that will fling sharks towards every player, these will land and explode for 2000-2400 typeless damage each. It is advised to surge away once the sharks have landed because if you surge too early they will still land underneath you.
Sand Pool: -As with every pool at 100k LP to stop attacking Yaka to allow time for the poison tank to complete their role. At 50k LP the CPR should be preparing to surge/run towards the beach to revive the Poison tank. Once Yaka’s health has depleted he will return to the centre pool.
Attack cycle: 4 auto-attacks, waterman, 4 auto-attacks, jellyfish spawn, 4 auto-attacks, Sand special, repeat.During this phase Yaka will activate his sand special that effectively puts all players but 2 into quicksand that will instantly kill them if they are not pulled free. If you are one of the players already freed it is advised to pull one of the player to pull someone up from the dps pile with the other player immediately running to free the base tank if its needed. Anyone that is freed should be prioritising pulling the rest of the team to safety before returning to deal damage to Yaka.
Stun Pool: -As with every pool at 100k LP to stop attacking Yaka to allow time for the poison tank to complete their role, unless the double poison has been completed in which case there will be no need to stop attacking as mechanic can be skipped by the already obtained poison. At 50k LP the CPR should still be preparing to surge/run towards the beach to revive the Poison tank. Once Yaka’s health has depleted he will return to the centre pool.
DO NOT USE STUNS on this pool as they will damage the entire team and if done incorrectly will inflict 5000 damage per stun.The following counts as a stun:
Melee: Backhand, Kick, Destroy, Forceful Backhand, Stomp
Ranged: Binding Shot, Tight Bindings (Rapid Fire is fine)
Magic: Impact, Deep Impact, AsphyxiateAttack cycle: 6 attacks, jellyfish spawn, 7 attacks, waterman, repeat.During this phase Yaka doesn’t possess any special attack of sorts instead he gains a damage reduction affinity that reduces any incoming damage and stack as far to making him completely invulnerable. It is the sole responsibility for the stun roles to reset the affinity stack by using stuns on Yaka periodically. A message is broadcast across the entire team when Yaka has been successfully stunned as well as the name for the player completing the stun. It is advised to use your dps thresholds after seeing this popup message to allow for maximum dps whilst the affinity is at its lowest.
Mirage Phase: -Once Yaka has been depleted down to 50k LP in the centre pool he will spawn mirages of himself that have 150k LP each on the all the pools except from the centre.
You should place yourself in the following positions dependant on your assigned roles: -
Base tank will take aggression of the tendril pool,
DPS will stand between the shark and tendril pools,
Shark Tag will be stood to the west/south of the shark pool and maintain aggression,
North Tank to be stood between the centre and sand pools ready to tag sand and provoke stun pool with the use of devotion,
Stun 0/5 to be stood southeast of the stun pool but close enough so that the North tank can support and to be ready to use devotion, adrenaline potion and onslaught.
Be wary that all special attacks are in effect but the designated roles are designed to be able to solely tank them however the team can still be caught out/off guard.
If any of the mirages is out of combat the entire team will have projectiles thrown at them dealing 2000 damage and is then increased by 2000 every 10 seconds per mirage pool that is left out of combat and unattended to.
Teams start with the Stun DPS on northern pool who kill and close it with planks (completed with one click) while simultaneously the rest of the DPS on shark pool who kill it (joined by the stun DPS after they're done) and the shark tag planks it (completed in one click), then move to the tendrils pool, then the sand pool. Once the sand tendril and sand pools have been depleted everybody will be required to stand melee distance of the pool and spam click it to fill it with sand in order to close it. If this is not done fast enough the mirage will respawn (within 5 seconds). It is highly recommended that when closing a pool to go within melee distance just before the health is depleted.
With the closure of the sand pool is it advised to delay depleting the health until after the quicksand special has been activated and the team has been freed as it is highly unlikely to close the pool within the 5 second timeframe with missing members.
Once all pools have been closed Yaka will spawn once more in the centre pool with 50k LP simply deplete it for the final time and that’s Yakamaru hopefully DEFEATED! You can then loot his body, good luck to all.
TIPS
■ The biggest tip of all is be sure to check out Video guides to gain some form of an idea to what’s happening during the kill as it is extremely intense and mechanic heavy.
■ Joining the ongoing call during the kill will be incredibly helpful whether you are a beginner/learner or a experienced/veteran.
■ Bringing a sign of life/portent of death as well as a ring of death is highly recommended.
■ Bringing a shield switch to make use of the resonance ability for extra heals on geyser spawns.
■Flanking perk does NOT remove the stuns on abilities during the fight and is not advised to be used particularly on the stun pool!!!
VIDEO GUIDES & EXTRA LINKS
https://runescape.wiki/w/Yakamaru/Strategieshttps://rs3bossschool.com/bestiary/raids/yakamaru/Video Guides: - Evil Lucario’s Dps Guide
Makeiru’s full in depth role guide